
When it comes to independent living, the bathroom setup is probably the most important room of the house for wheelchair accessibility. But it’s also something that most people aren’t planning for when they buy their home. Unless you’re already wheelchair bound by the time you’re house hunting, it’s not usually first on the priority list. But then a car crash changed everything overnight. Or a diagnosis slowly made the old setup unworkable. Or a parent needed to come home from rehab after a dangerous fall to a house that wasn’t ready.
Whatever brought you to this situation, the reality tends to be the same. A bathroom built around people with the ability to stand and step is suddenly the biggest and most dangerous obstacle in the house. Tub walls, wet tiles, narrow doorways, and low-sitting toilets create unavoidable hazards that wheelers can’t afford to navigate multiple times a day.
Balancing medical need with the financial burden of making your home accessible is no easy task; in many cases, it doesn’t take a full, gut-the-room-to-the-subfloors renovation. Remodels are expensive and take longer than most people have time to spare if there’s only one bathroom available. Instead, focusing on smart swaps you can do in a weekend, with minimal time with a plumber, can resolve the problem without tearing down walls.
Start With What’s Already There
Before you swing a hammer or head to the store, take a look at the room with the wheelchair in it to see what the situation requires. Where does the chair fit, and where will you get stuck? Where do you have to reach beyond your comfort or ability? What will the wheels catch on as you maneuver and turn? The goal is to match the space to how you actually move, not transform it into a magazine-worthy oasis. (I mean, you can. No judgment here!)
Most standard bathrooms have more usable room than they look like they do, once you pull out a vanity cabinet or reverse a door swing. A door that swings out instead of in can hand you back a surprising amount of floor. And if the door itself is the problem, swapping a standard hinge for an offset “swing-clear” hinge widens the opening by an inch or two for about $15, no framing work required.
Shower Ideas That Skip the Full Retile
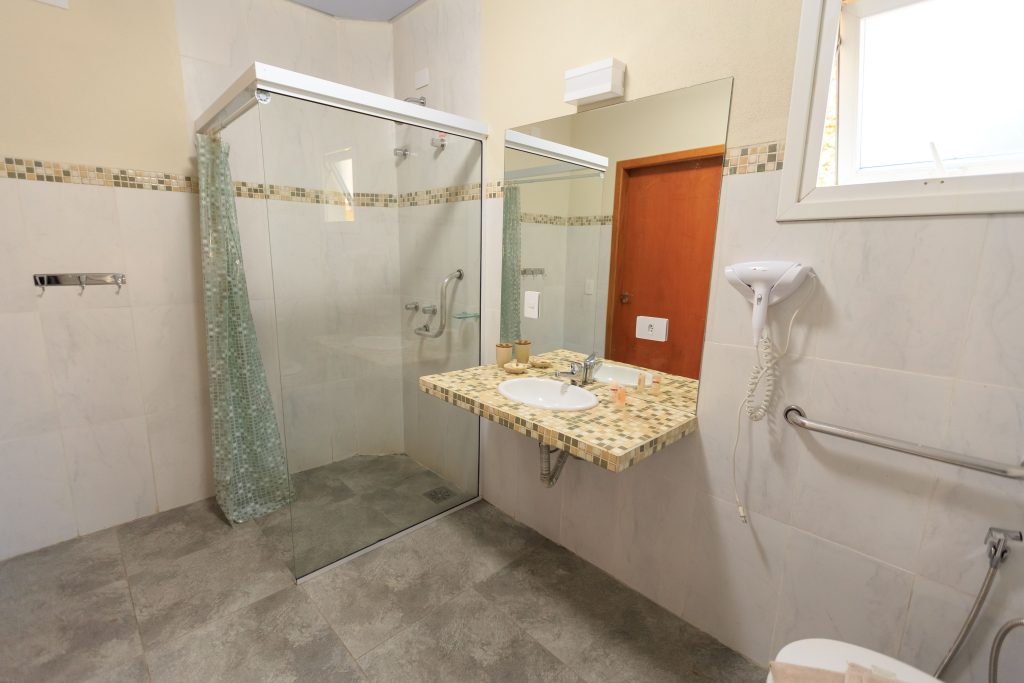
The two biggest obstacles in the bathroom are the toilet and the shower. Showers are where most wheelers hit a wall with hygiene needs, literally. A full bathtub or a shower door track your chair can’t clear can be resolved in a range of ways that run from a $20 add-on to a conversion costing several thousand. The right one depends on how you transfer, how much mobility you’ve got, and what you can spend, so it’s worth knowing all of them.
Start With the Shower You Have
If your current setup is manageable but could be easier, small changes can go a long way. This is the route for a person who can still transfer with limited assistance. Transfer benches that straddle the walls of a standard tub are used to slide across instead of stepping over the tub wall. These cost a mere fraction of the price tag of tearing out the tub.
For a curbed or tracked shower, look into a portable threshold ramp or a rubber “dam” that swaps a hard lip for a squishable one; it can make an existing stall workable for a lot less than a remodel.
Swap the Shower in a Day
You’ve probably seen the ads: a tub or an old stall pulled out and replaced with a low-threshold or barrier-free shower, “installed in a day.” For a lot of wheelers, this is the sweet spot. It’s far faster and cheaper than a full gut-and-retile; the walls go in as sealed panels instead of grout you’ll be scrubbing forever, and you can spec a low or zero threshold, a built-in fold-down seat, and grab bars from the start. The catch is that “one day” assumes your existing plumbing and footprint mostly work, so get the threshold height and door width in writing before you commit, because that’s what decides whether a chair can actually get in.
Go Fully Curbless
For higher support needs or a power chair, a true wheelchair accessible shower with a flush floor is often the only thing that really works, and it’s the most accessible option there is. It’s also the biggest job: it usually means a new pan, a re-sloped floor for drainage, and sometimes moved plumbing. Plenty of people run a bench-and-ramp setup or a one-day conversion for years while they save for this, and that’s a solid plan, not a compromise.
Seating, Controls, and the Stuff You Reach For
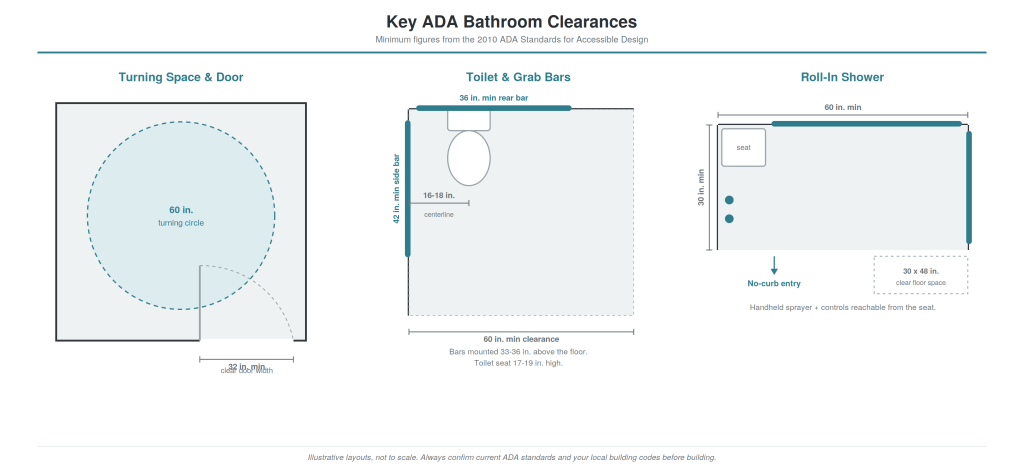
Whatever the entry looks like, the fixtures matter just as much as the floor. Get a sturdy shower chair or a wall-mounted fold-down seat rated for your weight, not the flimsy plastic stool from the drugstore. Move the controls and the showerhead to where you can reach them from a seated position, which usually means a handheld sprayer on a slide bar. These are some of the cheapest upgrades on this whole list, and they do more for daily safety than a lot of the expensive structural work. The U.S. Access Board’s guidance on toilet and bathing facilities lays out the reach ranges and clearances if you want the exact numbers.
Grab Bars: Cheap, Fast, and the Biggest Safety Win
If you do one thing this weekend, do this. Properly anchored grab bars beside the toilet and inside the shower prevent more falls per dollar than anything else on this list. The catch is the anchoring: a bar screwed into drywall alone is worse than no bar, because it gives you false confidence right up until it rips out.
Find the studs, or use heavy-duty toggle anchors rated for the load, and mount bars where you’d naturally grab, not where a diagram says they “should” go. Test each one hard with your full weight before you trust it. And skip the towel-bar-shaped “designer” versions unless the box specifically says it’s a weight-rated grab bar.
The Toilet and the Transfer
Using the toilet is the other priority of an accessible bathroom, and it’s also where the “right” setup depends entirely on the person. The options run from a $30 raised seat to a lift mounted in the ceiling, so it helps to know the whole ladder before you settle on one.
- How much weight can someone bear?
- Is there a caregiver in the picture?
- How much assistance do they need?
- How much space is needed for adjusting clothing, wiping, etc.?
Start With Height and a Grab Bar
A standard toilet sits low, which makes every kind of transfer harder than it needs to be. A raised seat or a taller “comfort height” toilet, paired with a wall-mounted bar or a floor-anchored rail, takes strain off whatever method you use, and none of it requires moving plumbing, which is where toilet projects usually get expensive. Start here no matter what else you add, because height and a solid handhold make everything downstream safer.
Transfers, From On Your Own to Hands-On Help
If you transfer on your own, the first thing to solve is space. You need room to bring the chair right alongside the toilet for a lateral, sliding move, and a transfer board can bridge the gap when the heights don’t quite line up. Sometimes making that room means relocating a trash can or a cabinet, not the toilet itself, so measure the clear space next to the bowl before you assume you need a contractor.
Not everyone slides across, though. If you can bear some weight, a stand-and-pivot transfer, where you rise, turn, and sit with a caregiver or home health aide steadying you, is common, and a sit-to-stand assist device can take the strain off both of you. For that, leave clear floor space on both sides of the toilet, not just one, so a helper actually has somewhere to stand and work.
When It’s Time for a Lift
If bearing weight isn’t safe or possible, a lift does the work instead of a person’s back. A portable floor lift, often called a Hoyer, rolls up and raises you in a sling, and for a permanent setup, a ceiling track lift can be installed overhead and run on rails from the bedroom into the bathroom, so one caregiver can move someone without any lifting at all. Pair either one with a toileting sling, which has an opening built in, and you can use the toilet without a full transfer off the sling.
Or Skip the Transfer Entirely
Sometimes the simplest answer is not transferring at all. A rolling shower-commode chair has a cutout seat and wheels, so someone can be positioned in the chair and then rolled directly over the toilet, lining the opening up over the bowl. It doubles for showering, it keeps transfers to a minimum, and for a lot of higher-support situations it’s the piece that makes the whole bathroom workable.
Which of these fits isn’t really a hardware question; it’s a body question, so it’s worth having an occupational or physical therapist watch an actual transfer before you buy anything. They’ll catch things a catalog won’t, like whether a stand-pivot is safe on a bad day or whether the ceiling can carry a track. That one visit can save you from buying the wrong thing twice.
Floors and Mats That Won’t Betray You
Wet tile is slick, and a chair’s wheels plus a slick floor is how people end up on the ground. You don’t have to retile to fix it: peel-and-stick anti-slip treads, a textured no-slip coating you brush on, or a rubber-backed low-pile mat that a chair can roll over all help. The word that matters is “low-pile,” because a thick bath mat is a tipping hazard and a wheel-catcher, not a comfort.
Quick Answers: Door Width, Medicare, and More
How Wide Does a Bathroom Door Need to Be?
The ADA minimum is 32 inches of clear width, but most wheelers are more comfortable with 34 to 36 inches, especially for a straight-on approach. Clear width is measured with the door open at 90 degrees, so a 34-inch door gives you a little less than 34 inches of actual passage. If you’re an inch or two short, the swing-clear hinge trick above is far cheaper than rebuilding the frame.
Will Medicare Pay for Any of This?
Usually not, and it’s worth knowing that going in. Medicare Part B treats grab bars, ramps, and roll-in showers as home modifications rather than durable medical equipment, so it generally won’t cover them. Some Medicare Advantage plans have started adding limited home-safety benefits, so it pays to check your specific plan, and Medicare’s page on durable medical equipment coverage spells out what does and doesn’t qualify.
Do I Need a Permit?
For the swaps in this guide, almost never: grab bars, seats, mats, and hardware don’t touch structure or plumbing. You cross into permit territory when you move plumbing, alter walls, or pour a new shower pan. That line is a handy budget signal too, because “no permit needed” usually means “no contractor needed” as well.
Start Small, Then See What You Actually Need
Here’s the thing nobody selling a $20,000 remodel wants to say: fix the grab bars, the seat, the floor, and the entry first, live with it for a month, and then decide whether you still need the big job. A lot of wheelers find that the “must-have” full renovation quietly becomes a “someday, maybe.” Most of a wheelchair accessible bathroom, it turns out, comes down to a handful of well-placed, weight-rated fixtures rather than new walls, so start with the cheap, fast, high-impact changes and let your real daily use tell you what’s worth tearing out a wall for.




One Comment